This program is the front end for a system that I have developed with the assistance of programmer Doug Loucks for reducing extracting photometry from CCD images stored as FITS files. The entire package that I call CCDPHOT is actually a collection of tools based on IDL (Interactive Data Language, RSI, Boulder, CO) and its widget interface to a windowing operating system. Among these tools there are two main widgets that the user sees as the "front end" to the package, CCDPHOT and ITOOL (CW_ITOOL). Please note that in all the editable widget areas in CCDPHOT and ITOOL, you must hit enter to actually record the change. Always look to the command console window for the confirmation that a value has been changed.
This system provides for most of the common image calibration steps required by CCD camera systems in regular use in astronomy today. Taking advantage of the fast array processing speed of IDL this system uses raw data and a collection of calibration files to present a calibrated image that the user then analyzes. This approach greatly reduces and simplifies the data archival and storage requirements for CCD photometry since the raw data files are often saved as 2-byte integer data while reduced images are typically kept as floating point images. This system has also been designed to work with read-only storage media such as recordable CDROM.
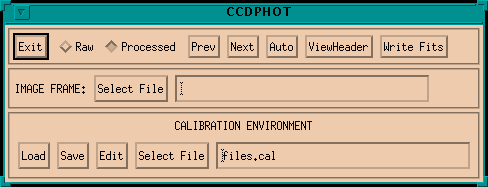
A front-end program named CCDPHOT provides a widget interface to select FITS images to be read from disk, processed, and displayed. When invoked from the IDL command prompt with "ccdphot", you will be treated to a screen that looks like this:
By default, this program looks in the current directory for image files but the user can enter a relative or absolute path to any file or use "Select File" to select an image using a browser. The path for images can be overridden by a keyword parameter when CCDPHOT is invoked. This mechanism is important when reading from read-only directories so that output files fromt his program can be written to the current (write-access) directory.
To get started using the tool, click "Select File" or type a file name into the editable box to its right. This program expects to read FITS files. Any other file type will (hopefully) generate an error message and won't be loaded. As soon as the image is read in it is processed (aka. calibrated) to the extent possible given the information the calibration environment. After processing, ITOOL (image processing tool) is started and given the newly calibrated image to display.
The Raw/Processed buttons allow for displaying the raw data as read from the file or data processed by the various calibration steps. Clicking "Prev" or "Next" will automatically decrement or incrementing the file name by one if the suffix is a 3 digit number and cause that new file to be loaded. Nothing happens if the file name is not in this format.
"Auto" causes the automatic photometry function to be activated. To enable, you must have just done either single object photometry (right click) or template object photometry (left click) on the currently viewed frame in ITOOL. By clicking "Auto" you are requesting an automatic file increment and then an exact replica of the photometry you just did. You are given the opportunity to specify a stopping frame number or to just let it run until the object name changes. The are some protections in this mode for excessive image wander or large changes in photometry or seeing. Out-of-bounds variations will interrupt the automatic processing.
"ViewHeader" permits viewing the full FITS header from the file without interpretation. "Write Fits" will cause the current calibrated file to be written to disk. The new file name will be the same as the old except that a 'c' will be appended to the root of the file name.
Some information needs to be provided by the FITS header to facilitate the reduction steps handled by this program, such as exposure time, filter, start time of observation, etc. The user can provide a keyword correspondence file to allow the program to decode the needed information using the KEYLIST keyword.
There are a few keyword parameters allowed when you start CCDPHOT.
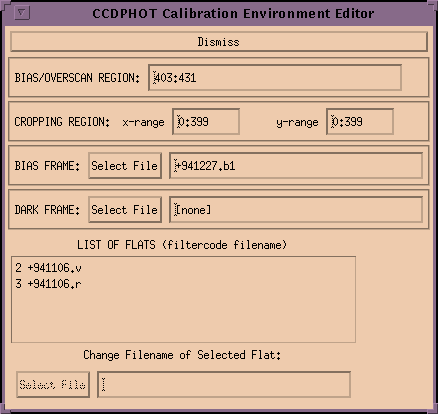
The bottom row of buttons on the CCDPHOT screen permit the user to manipulate the calibration environment. Information about calibration steps are stored in calibration description files and are loaded, save, or selected with the buttons on CCDPHOT. If you select the "Edit" button the following control screen is brought up.
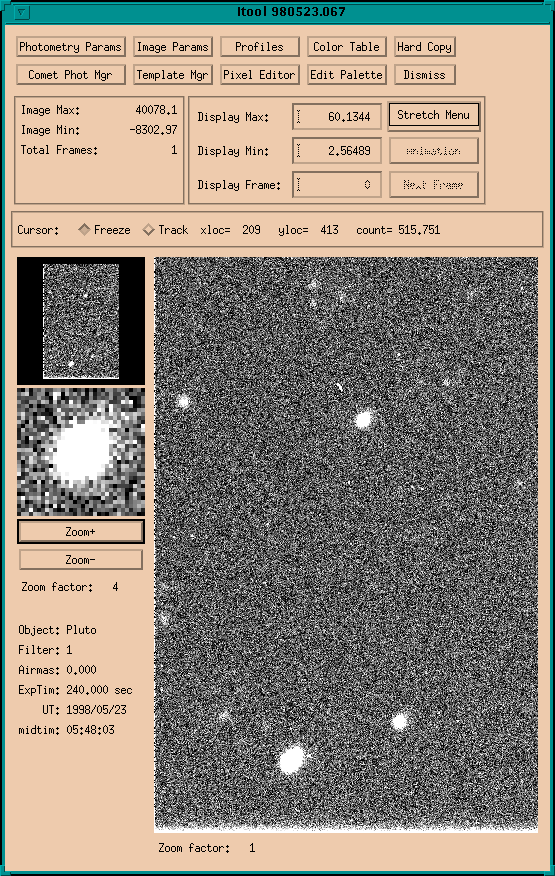
ITOOL is a generic image display tool that also supports aperture photometry extractions. It can be used directly from the IDL command line (ie., itool,image) but its functionality is limited if the ancillary information is not provided (such as exposure time, object name, etc.). When used in a widget environment (such as with CCDPHOT), this ancillary information is provided automatically. As soon as you select a valid file in ccdphot, the itool widget will display. (Example screen, 291k image)
The operational options are controlled with the top set of buttons.
This button causes the following widget to pop up with the current aperture photometry extraction parameters displayed:
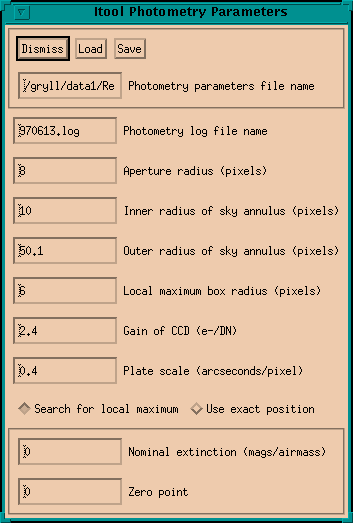
The information contained in this widget can be saved to a Photometry Parameter File for later use. The photometry log file is the file where all aperture photometry is saved. This file is appended to (never overwritten) each time you make a photometric measurement. The file is also never left open in case of program failure or other abnormal termination.
The photometry extraction from the image is done with circular apertures. The central aperture is centered on the object. The sky signal in this aperture is estimated from the sky signal found in an annulus centered on this aperture. You can control the main aperture radius and the inner/outer radii of the sky annulus. The effects of bad pixels, field stars, and when the annulus falls off the image are automatically removed. This process work very, very well if you have flat sky background on your image.
The local maxiumum box radius allows you to specify how far from the cursor click the program can look for a local maximum. This means you don't have to precisely click on the object, just get with this radius of its peak and you'll be fine. The zoom window is always recentered on the final position so you can see if the wrong object was found. Note that this searching is not done if you select the "Use exact position" option. This option is provided for generality but is very rarely used.
If you know it, you can also specify the gain of the CCD and the plate scale. This will ensure more accurate magnitude uncertainties and will also show you the seeing in the image in arcseconds.
Finally, you can specify a nominal extinction and photometric zero point for your system. There is as yet no provision for having different numbers for different filters so you would likely just put in the values for your most used filter. These numbers are used for informational purposes only in the number printed to your screen. The numbers saved to the photometry log file are not affected.
Each image has a set of information about it that is required for doing photometry. This group of information can potentially change with each image and is provided by CCDPHOT by decoding the original FITS header. You can check (or override) any of the image values by clicking the Image Params button to bring up the following widget:

Most of these values are self-explanatory and are collected directly from the header. The Julian Date (mid-time) is computed from the start time/date and the exposure time. The exposure delta is used to derive an exposure mid-time if the image come as cubes in the original files.
Several different image profile and display sub-tools are wrapped up into this button. When you click, you get the following window by default:
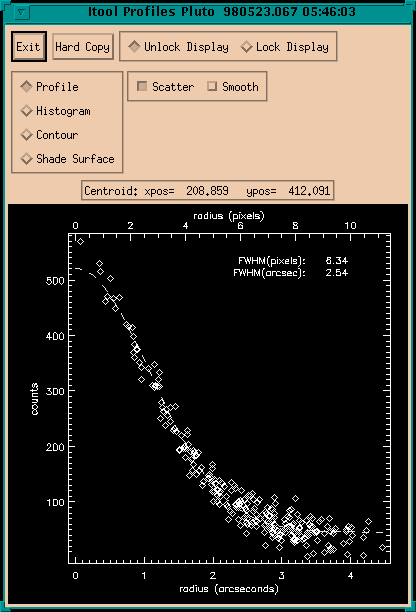
There are 4 different basic plot types that give you different views of the sub-image in the zoom window. Most of these functions should be self-evident. Note that you can click "Profiles" more than once and have multiple plot displays on the screen at the same time. The toggle for "Unlock Display"/"Lock Display" allows you freeze that widget from further updates. Normally, as the zoom window changes, the profiles widget(s) is updated but if it has been locked, this update is ignored. The hardcopy button sends a postscript plot to the current default printer.
This is a special photometry mode to be used with an extended object with a complicated morphology (like a comet). When active, you see the following widget and the left mouse button is used for comet photometry.
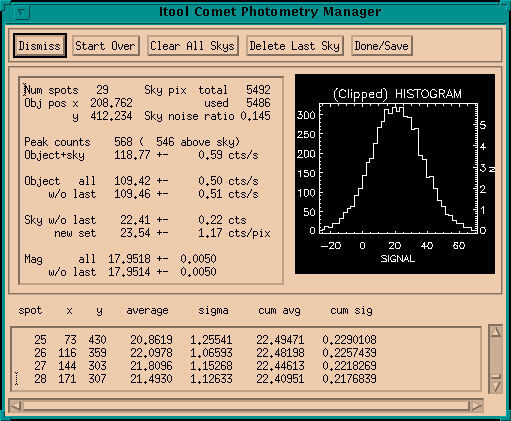
On a new object (widget is blank), the first click records the location of the object and integrates the total signal. The second and subsequent clicks are used to grab a patch of sky with the same size as the object aperture. Any pixels grabbed are added to the sky sample. As you collect more sky, the widget values update and let you see the current quality of the sky sample. You do not have to worry about overlapping your sky selections as a given sky pixel will only be added to the sky sample once.
This is one of the most often used features of ITOOL. Templates refer to a pattern of objects that you define and are allowed to set special names for. When active, the left mouse button will perform the template photometry operations and you see the following widget display:
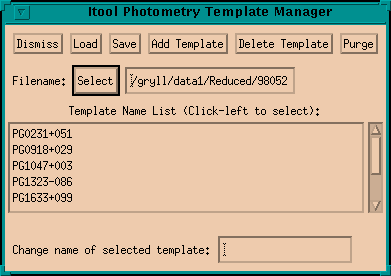
Here a pre-existing template file was loaded showing a list of names for a set of templates, in this case a set of relative positions for Landolt standard photometric reference fields. You can re-use these templates on as many nights worth of data as you wish with the one proviso: the image scale and orientation must be roughly the same. If you click "Save" you get a copy of the current set of templates in a Object Template File for later use. Upon selecting an object you get an additional control widget:
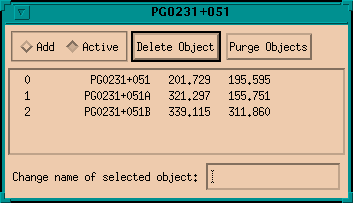
This widget has two modes: Add and Active. When in Add mode, a left click will cause that position to be added to the template. When in Active mode, a left click causes photometry to be done on the template positions as listed.
The internal use of a template is actually more complicated than would appear at first glance. The first object is always special and photometry of the template begins at the mouse click position and not at the position shown on the widget. The position for the other objects is derived from the template and the clicked position. The template basically records the position of the objects relative to the anchor (object 0). It is also permitted for the anchor to move (slowly) relative to the other objects. This is especially useful for doing asteroid photometry where the asteroid moves through a star field. Note, however, that the positions for the template are continually evolving and changing as they are used. When used with a moving object, you must extract the photometry in time order or the other stars will be "lost".
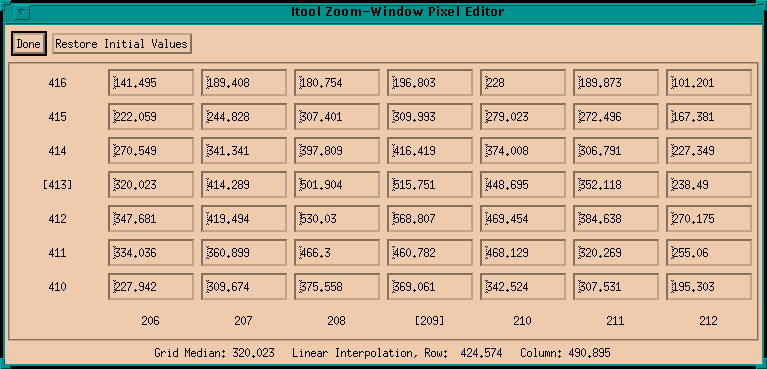
The pixel editor lets you manually change one or more pixels in an image. It is used in those cases where you might have a cosmic ray strike too close to an object image. You can estimate what the affected pixel might have been and edit it directly. Any changes made with this tool are shown immediately in the main image display window. This sub-tool is not used very often and may have problems related to version drift in IDL.
"Color Table" brings up the IDL standard tool, XLOADCT. "Edit Palette" brings up XPALETTE. "Hard Copy" sends a postscript copy of the image to the default printer. "Dismiss" will remove ITOOL from your screen but it will come back if you load a new image with CCDPHOT.
Below the option buttons are shown the current image extrema and the number of frames in ITOOL. When started, the display min and max are set to a hard stretch on the sky but can be changed with the min/max editing areas. You can also easily return to a min/max scaling or original sky scaling with options tucked under the "Stretch Menu".
On the left side of the tool are two smaller images windows. The upper left window is a thumbnail representation of the full image. Just below that is the zoom window along with the controls for the zoom factor. The image window will try to show all the image at once but if it is too big, then sliders will become active and allow panning around in the image. In the thumbnail window, a middle click will cause the main window to be centered on that location as best as possible. In the main window and zoom window, left click for Comet or Template photometry, middle click to (re)center the zoom window on the clicked location, or right click for single object photometry.
The display for "Cursor" shows the current location of the zoom window if "Freeze" is selected or the current cursor location if "Track" is selected. Also shown is the DN value from the image at that location. Below the zoom window controls is a summary of some of the image information.
A calibration descriptor file contains all the information required to process a raw CCD image to a final calibrated state. These steps are applied whenever CCDPHOT is set to auto-process the incoming images (selected using the Raw/Processed buttons). It is useful to note that I always group collections of CCD images by night . That is, one night's data is contained within a single directory. I then provide calibration information in this directory for each night, even if that means making duplicate copies of the calibration images. This way, each night's data can be treated in a stand-alone manner.
CCDPHOT will, by default, look in the data directory (controlled by the PATH keyword) for a directory named "calib" for a file named "files.cal". You can override the calibration directory by the CALIBPATH keyword. You can also override the default file name by using the CALIBFILE keyword. The following listing shows an example calibration description file (on the left) together with a short description of each line.
+----------------------+--------------------------------------------+
| files.cal            |  Description                               |
+----------------------+--------------------------------------------+
| calib_file_v03       |  line 1: version id tag                    |
|    -1   -1           |  line 2: overscan columns                  |
|     0   95   -1   -1 |  line 3: cropping region x1,x2,y1,y2       |
| +951001.b1           |  line 4: superbias image                   |
| [none]               |  line 5: superdark image                   |
| 3 +951001.r          |  line 6-end: superflat correspondece list  |
| 2 +951001.v          |                                            |
+----------------------+--------------------------------------------+
There are older versions of the calibration description files that are automatically converted and used by CCDPHOT. All calibration description files written by CCDPHOT will be in the latest version.
The overscan region allows for a section of columns that measures the electronic bias of the camera. At present, CCDPHOT assumes the overscan is fit with a constant. If, as in this example, you do not want the overscan correction, then both numbers should be set to -1.
The cropping region allow for saving only a portion of the full raw image prior to applying the bias, dark, and flat corrections. Commonly, this is used to trim off the overscan columns but it can also be used to only save a sub-array in case the useful image does not fill the CCD. The x and y limits are treated as pairs, setting a pair to -1 requests that no cropping be done in that direction without having to know the size of the array for the file. In the above example, I've selected to keep all rows (y) but keep only columns (x) 0 to 95. Note that all of these pixel coordinates are zero-indexed.
The next line contains the file name of the superbias image to be subtracted from the overscan-corrected, cropped image. This image must be the same size as the cropped image. If you wish to bypass this correction put [none] as the file name. This file name can be just a file name in which case the file will be loaded from the current directory (by default), or the data directory (PATH= specified), or the calibration directory (CALIBPATH= specified). If you provide an absolute path name, the file will be loaded from there directly. If you preface the file name with "+" as in the above example, the file will be loaded from the same directory that the calibration description file was found. This allows you to create description files that will work even if you move the data to another directory. I needed this when I began creating CDROM archives when I can no longer count on the disk being loaded or read in a predictible fashion.
Line 6 is for a dark count image. This image, if used, should be in counts per second and will be corrected by the exposure time of the raw frame for the proper dark count subtraction. As with the bias image, set the file name to [none] to disable the correction.
The rest of the file is a list of flat field images. There are two fields to each line. The first is a number or string which will be found in a FILTER (or similar) keyword in the raw data file's header. The second field is the name of the flat field image to use when the filter string is found. This should be a normalized flat field for best results.
Most of the details of the inner workings of this file can be blissfully ignored since the Calibration Environment Editor tool usually handles reading and writing this file. I will usually use this editor to create a new calibration file for a new night of data rather than edit the file manually.
Note that all of these files are loaded into memory when the calibration description file is read. If you later change one of the calibration files, you must remember to reload that file (using the calibration editor) to have the changes take effect. This design does sometime require substantial amounts of memory but can significantly speed processing if your machine has enough memory for all this information.
This list associates a set of standard names with the actual keyword names found in a FITS file header. If no file name is supplied with the KEYLIST keyword, a default list is used, as if a file with the following contents had been supplied:
           AIRMASS   K  AIRMASS
           DATE      K  DATE-OBS
           DATETMPL  T  DD-MM-YYYY
           EXPDELTA  V  0.0
           EXPTIME   K  EXPTIME
           FILTER    K  FILTERS
           FILENAME  K  CCDFNAME
           OBJECT    K  OBJECT
           UT        K  UT
The first column is the standard name, which CCDPHOT expects.
The middle column is a flag that indicates the contents of the third
column for that item. It may be K, for Keyword, T, for Template, or
V, for Value. If it is K, then the last column is the FITS keyword that
should be looked for in the header to get the desired information.
If it is T, then the third column provides information on how to decode
information. At present, DATETMPL is the only allowed template and it
provides the order of the day, month, year files of the DATE keyword.
If it is V, the contents of the third field on that line should
make sense for the name in the first field. V is used for values that
are missing from the header but need sensible default values. Many more
keywords could be scanned for to provide even more interpretation of the
image but this set was deemed to be the minimum useful set needed for
doing aperture photometry.
The following is an example of a photometry parameter file as saved by ITOOL. The important information (for the program) is the file version tag (first line) and then the values at the start of each line. The comments on the rest of the line are ignored by the program and are regenerated when the file is saved.
   phot_parms_v01
   970613.log   Photometry log file name
   8    Aperture radius (pixels)
   10   Inner radius of sky annulus (pixels)
   50.1 Outer radius of sky annulus (pixels)
   6    Local maximum box radius
   2.4  Gain of CCD (e-/DN)
   0.4  Plate scale (arcseconds/pixel)
   0    Exact position flag
   0    Nominal extinction (mags/airmass)
   0    Zero point
1   filename (no path), used for id and for REPHOT.
2   Object name (must have enclosing single quotes).
3   Filter id string.
4   JD of mid-time of measurement
5   Exposure time (seconds).
6   Gain of CCD (e-/ADU).
7   Object aperture radius (pixels).
8   Inner sky annulus radius (pixels).
9   Outer sky annulus radius (pixels).
10  Serial number (unique counter on each frame, starts at 0000).
11  Centroided x position of object.
12  Centroided y position of object.
13  FWHM of image (pixels or arcsec depending on if plate scale set).
14  Peak signal in image (ADU).
15  Instrumental magnitude.
16  Uncertainty on magnitude.
17  Flag, 0 means measurement good, 1 means it is bad (not used by ITOOL).
An example of an object template file is shown below. Normally, this file is manipulated by ITOOL but you can, in a pinch, edit the files yourself. The first line is the version tag. "phottemp_v01" is still read and recognized but is automatically promoted to a version 2 file. Following the tag is one or more templates. Each template is a group of lines starting with a template name. The next line is a number which specifies how many positions are in the template. The rest of the group of lines show the x,y position and name of the object. If the object name is default, then the name stored in the photometry log file will be the object name from the header.
   phottemp_v02
   PG0231+051
              3
      201.729   195.595  PG0231+051
      321.297   155.751  PG0231+051A
      339.115   311.860  PG0231+051B
   PG0918+029
              4
      292.774   299.256  PG0918+029A
      101.380   239.029  PG0918+029B
      261.462   506.767  PG0918+029C
      324.420   100.377  PG0919+029
   PG1047+003
              4
      130.496   177.485  PG1047+003
      197.606   257.919  PG1047+003A
      300.254   321.647  PG1047+003B
      125.968   489.432  PG1047+003C
   PG1323-086
              4
      321.178    71.185  PG1323-086B
       58.627    62.261  PG1323-086C
      289.008   488.271  PG1323-086D
      117.450  -266.598  PG1323-086
